Painting miniatures is an art that combines precision, creativity, and patience. It’s an activity that not only allows enthusiasts to bring their game figures to life but also provides them with a way to express themselves and enjoy their hobby. Whether you’re just starting out in the world of miniature painting or you already have experience but want to improve your skills, this guide will provide you with all the information you need. From basic materials to advanced techniques, you’ll find everything necessary to take your art to the next level.
Why is painting miniatures important?
Painting your miniatures not only enhances their appearance but also enriches the gaming experience. A well-painted figure adds immersion and realism to the game, while also reflecting your dedication and artistic skills. Whether you play Warhammer, Dungeons & Dragons, or any other miniature game, having a well-painted army or collection can be a source of pride and a conversation starter among fellow enthusiasts.
Essential materials to get started
Before you begin painting, it’s crucial to have the right materials. Here’s a list of essentials:
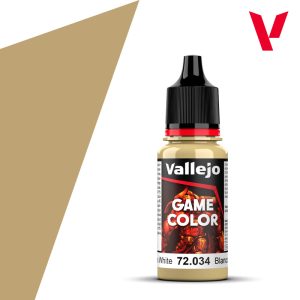
- Acrylic paints: Acrylic paints are the most recommended for miniatures due to their versatility and ease of use. Brands like Vallejo and Citadel offer a wide range of colors and effects.
- Detail brushes: Brushes are key tools for achieving a good finish. It’s important to invest in quality brushes that maintain their shape and tip. Kolinsky sable brushes, like the S and M series from Artis Opus, are highly recommended for their precision.
- Primer: Primer is essential to ensure the paint adheres properly to the miniature. It can be applied with spray or airbrush and comes in different colors depending on the color scheme you plan to use.
- Wet palette: A wet palette will allow you to keep the paint fresh for longer, making mixing easier and preventing waste.
- Magnifying glass or LED lamp: For working on fine details, it’s advisable to use a magnifying glass and good lighting, which not only helps you see better but also reduces eye strain.
Preparing the miniature
Before you start painting, it’s essential to prepare the miniature:
- Assembly: Assemble the miniature’s pieces using cyanoacrylate glue or plastic cement, and make sure all parts are well-attached and without gaps.
- Cleaning: Wash the miniature with water and soap to remove any oil or dust residue that might interfere with paint adhesion.
- Priming: Apply a layer of primer over the entire miniature. This can be done with spray, brush, or airbrush. Gray primer is a versatile option that works well with most color schemes.
Basic painting techniques for miniatures
Learning the basic painting techniques for miniatures well is essential for building a solid foundation in this hobby. These techniques allow you to achieve good results from the start and serve as the groundwork for more advanced techniques. Below, I explain some of the most important ones:
Basecoating
Basecoating is a basic technique where base colors are applied to different areas of the miniature, visually separating the various parts before working on the details.
- How to do it: Simply paint each area of the miniature with a base color, for example, paint the armor one color, the skin another, and so on. Don’t worry about smaller details at this stage; the goal is to clearly define the areas that will be worked on later.
- Common uses: This technique is used at the beginning of the painting process to establish the basic colors for each part of the miniature, making it easier to work on details and shading afterward.
Layering
Layering is a technique that involves applying several thin layers of paint to gradually build up color and achieve smooth transitions between light and dark tones.
- How to do it: Start with a dark base and apply successive layers of lighter colors on the areas you want to highlight. Each layer should be smaller than the previous one to create a natural gradient. It’s important to use thinned paint so that the transitions are smooth and there are no harsh lines between the colors.
- Common uses: Painting large surfaces such as capes, skin, or armor, where a uniform and smooth finish is desired.
Dry Brushing
Dry brushing is a widely used technique to highlight details on a miniature. It’s especially useful for showcasing textures and adding depth without requiring advanced skills.
- How to do it: Load a brush with a small amount of paint, preferably a stiff-bristled brush. Then, remove the excess paint by rubbing the brush on a textured surface until it barely leaves a trace. Next, lightly drag the brush over the raised areas of the miniature. The paint will only adhere to the highest surfaces, creating a natural highlighting or weathering effect.
- Common uses: Highlighting armor edges, texturing rocks, painting textured surfaces such as chainmail or fur, and simulating wear on metals and other rough materials.
Washing
Washing is a simple yet powerful technique that helps add shadows and depth to a miniature with very little effort.
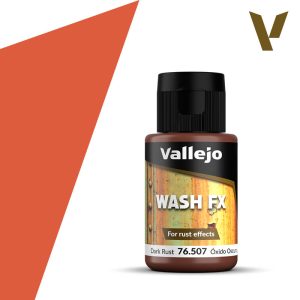
- How to do it: A wash is a diluted paint mixture that is applied over the miniature. The fluid paint settles into the recesses and lower details, creating automatic shadows that enhance the texture of the figure. You can use commercially available pre-mixed washes or make your own by diluting acrylic paint with water or a specific medium.
- Common uses: Creating shadows in areas like clothing folds, armor crevices, and facial details such as eyes or wrinkles.
Detailing
Once you have the base colors and shadows applied, it’s time to add the fine details that will make your miniature stand out.
- How to do it: Use a fine brush and undiluted paint to add details like eyes, jewelry, armor decorations, or any small elements you want to highlight. It’s important to keep a steady hand and work slowly to avoid mistakes.
- Common uses: Painting eyes, embroidery on clothing, gems, weapon decorations, and any other small detail.
Advanced painting techniques for miniatures
Advanced painting techniques for miniatures are those that require a higher level of skill and understanding of color theory, light, and shadows. These techniques will allow you to take your miniatures to the next level, creating impressive effects and exceptional realism. Here’s an explanation of some of the most notable advanced techniques:
Zenithal Shading
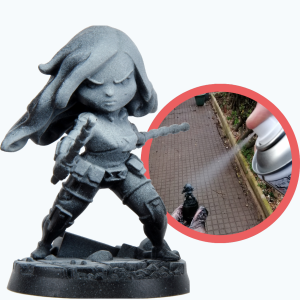
Zenithal shading is an advanced technique used to simulate lighting from a high point, such as light coming directly from above (like the sun at noon).
- How to do it: First, the miniature is primed with a dark base coat, such as black or gray. Then, a lighter primer, such as white or light gray, is applied from above, mimicking the direction of the light. This technique provides a natural guide for shadows and highlights when you begin applying colors.
- Common uses: Creating a light and shadow map on the miniature before painting the final colors.
Feathering
Feathering is a technique that allows for smooth transitions between colors using short, light brush strokes that blend the edges between them.
- How to do it: Over a basecoat of the darker color, apply the lighter color in the corresponding area you want to highlight and, before it dries, use a clean brush to smooth the edges, working them into the color you painted underneath.
- Common uses: Lighting and shadow effects on smooth surfaces such as cloth, skin, or armor.
Glazing
Glazing is a technique similar to layering but with even more diluted layers. It is used to smooth out color transitions or slightly modify the tone of an already painted area.
- How to do it: Dilute the paint until it has an almost transparent consistency. Apply the paint in very thin, even layers, allowing each one to dry before applying the next. This process allows you to adjust the tone and smooth out color transitions.
- Common uses: Adjusting skin tones, smoothing gradients on armor, and adding subtle color nuances on large surfaces.
Wet Blending
Wet Blending is a technique where two or more colors are blended directly on the miniature while the paint is still wet. This allows you to create very smooth transitions very quickly.
- How to do it: Apply the colors on the miniature without waiting for them to dry and use a clean brush to blend the edges where the colors meet. It’s important to work quickly and in small areas to avoid the paint drying before achieving the desired effect.
- Common uses: Gradient effects on capes, skin, and any surface requiring a smooth color transition.
Sponge Texturing
Sponge texturing is a technique used to add effects of wear, dirt, or damage to a miniature.
- How to do it: Use a fine-grain sponge, lightly dip it in paint, and remove the excess. Then, gently press the sponge onto the miniature in the areas where you want to add texture, such as armor edges or exposed surfaces.
- Common uses: Simulating wear on armor, adding rust, or creating dirt effects on vehicles and structures.
Non-Metallic Metal (NMM)
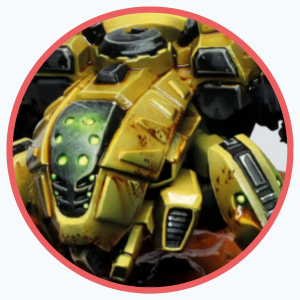
Non-Metallic Metal is an advanced technique that simulates the appearance of metallic surfaces using non-metallic paints. The goal is to create the illusion of shine and reflection through careful use of light and shadows.
- How to do it: To replicate metal, choose a color palette of grays or browns for metals like steel or gold, respectively. Apply layers of paint so that the lighter points mimic the reflection of light, while the darker areas represent shadows. It’s crucial to understand how light interacts with surfaces to correctly apply this effect.
- Common uses: Armor, swords, helmets, and other metallic elements on the miniature.
![]()
Object Source Lighting (OSL)
Object Source Lighting is a technique that simulates light emanating from a specific object within the miniature, such as a torch or a magical sword, and how this light affects nearby surfaces.
- How to do it: First, identify the light source and the areas that should be illuminated. Use bright, desaturated colors to simulate the light at the source and apply gradually to adjacent surfaces. The closer the surface is to the light source, the more intense the illumination should be. As you move away from the source, blend the colors to simulate the dispersion of light.
- Common uses: Enchanted swords, glowing eyes, torches, and any object emitting light.
Tips to improve your skills
Practice regularly: Like any skill, painting improves with practice. Dedicate time regularly to painting to perfect your techniques.
Study the work of other painters: Observe and learn from other artists. Platforms like YouTube and Instagram are excellent for finding tutorials and examples of different painting styles.
Experiment with new materials and techniques: Don’t be afraid to try new tools or techniques. Innovation in miniature painting can take your work to the next level.
Join a community: Being part of a painting community can be very beneficial. Not only will you stay motivated, but you’ll also receive constructive feedback and learn from others.
Conclusion
Miniature painting is a wonderful way to immerse yourself in your hobby and bring your figures to life. With the right combination of materials, techniques, and practice, you can transform any miniature into a work of art.
Don’t hesitate to explore and experiment to discover your own style and improve your skills!